Introduction and Team Setup
Liverpool’s Structure
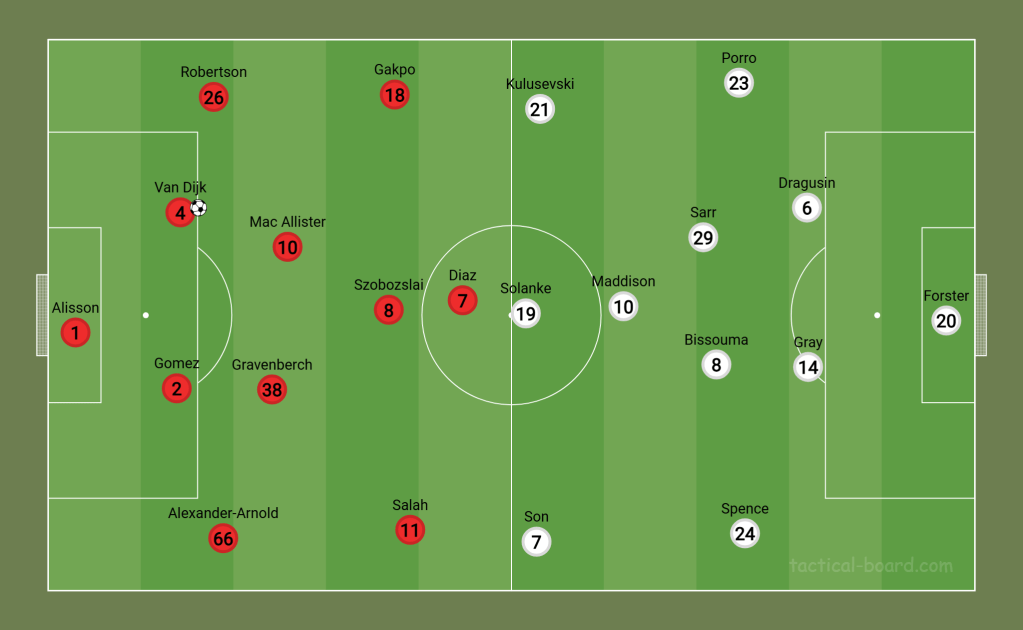
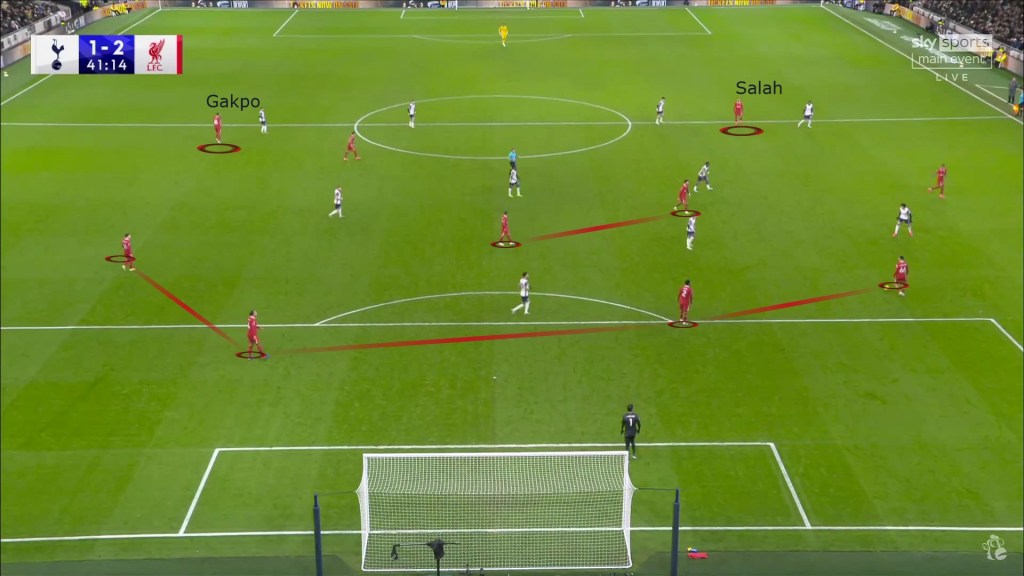
Liverpool employed a 4-2-3-1 formation on paper, transitioning to a fluid 4-2-4 in possession and a 4-4-2/4-2-4 midblock out of possession.
- The front four (Salah, Szoboszlai, Diaz, Gakpo) displayed dynamic positional interchange.
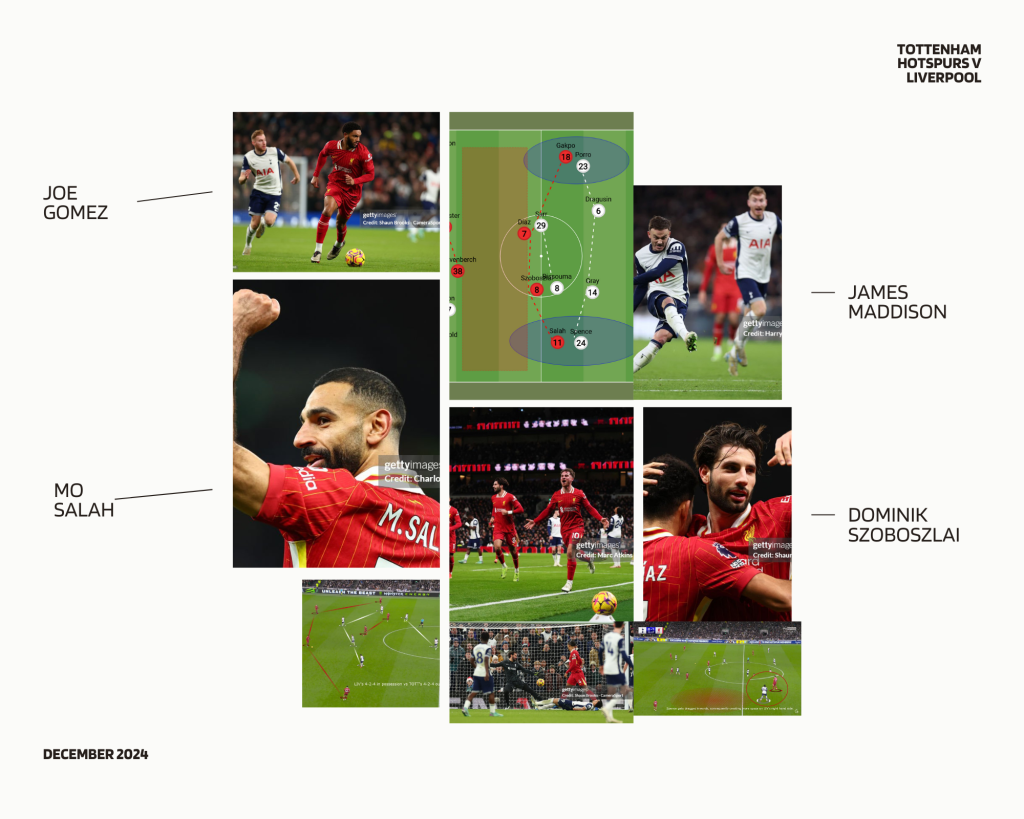
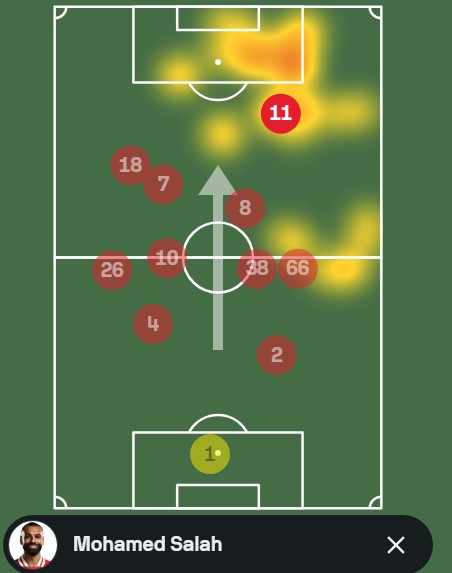
- Salah and Alexander-Arnold dominated the right side, with Salah frequently occupying the right half-space in the final third.
- Szboszlai and Gravenberch drifted to the wide areas when Liverpool had to defend counter attacks
- The center-backs played a key role in build-up play, baiting the opposition press which would create gaps for them to pass into the midfield.
- In defensive game states, Liverpool used a mid-block to prevent central progression, forcing opponents wide.

Liverpool began the match with a 4-2-3-1 formation that morphed into a 4-2-4 during attacking phases. This setup emphasized fluidity and attacking synergy among Salah, Szoboszlai, Diaz, and Gakpo, who seamlessly interchanged positions to unsettle Spurs’ defensive structure. Salah’s tendency to drift forward and into the right half-space complemented Alexander-Arnold’s advanced role, creating overloads on that flank.
Meanwhile, the center-backs contributed significantly in possession, inviting pressure to create gaps further upfield. On the defensive end, Liverpool’s disciplined mid-block neutralized Spurs’ central progression, directing play to the flanks where they were less threatening.
Tottenham’s Structure
Tottenham used a 4-2-3-1 formation with a 4-2-4 high-pressing defensive structure and 3-4-3/3-3-4 attacking structure.
- Relied on man-to-man marking during pressing phases.
- Maintained an ambitious high defensive line, often leading to vulnerabilities.
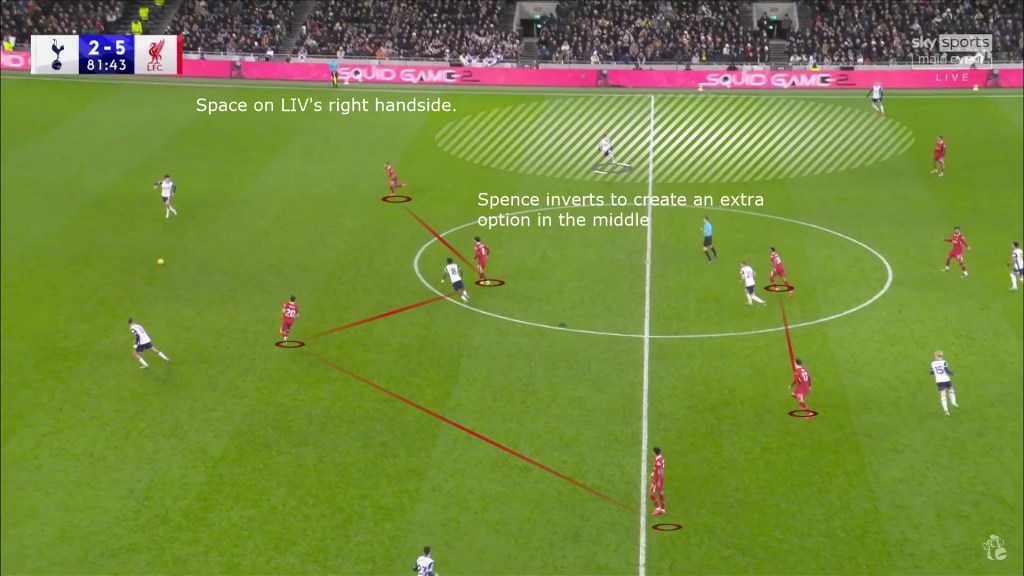
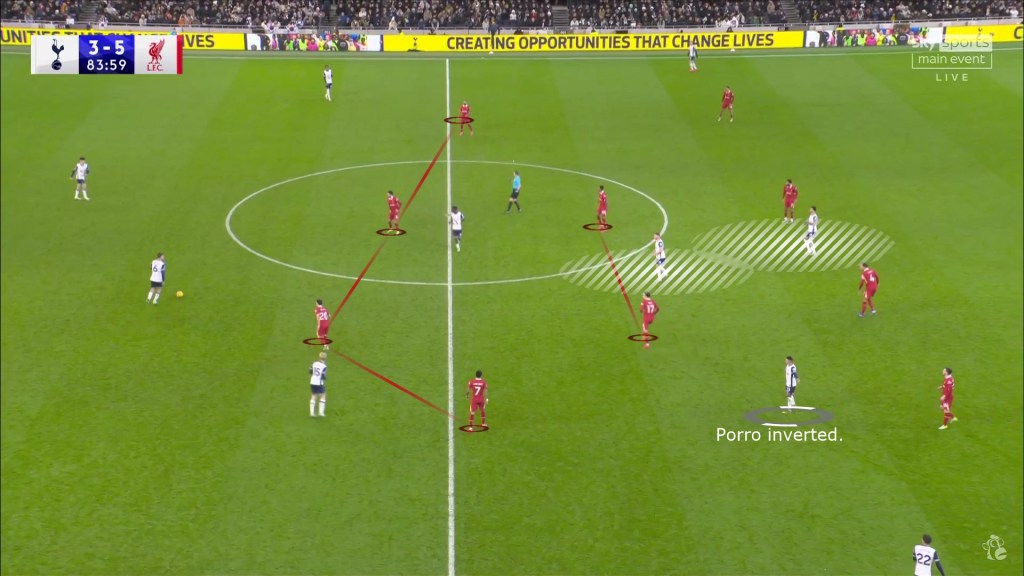
- In possession, Pedro Porro operated in an inverted role to facilitate vertical progression.
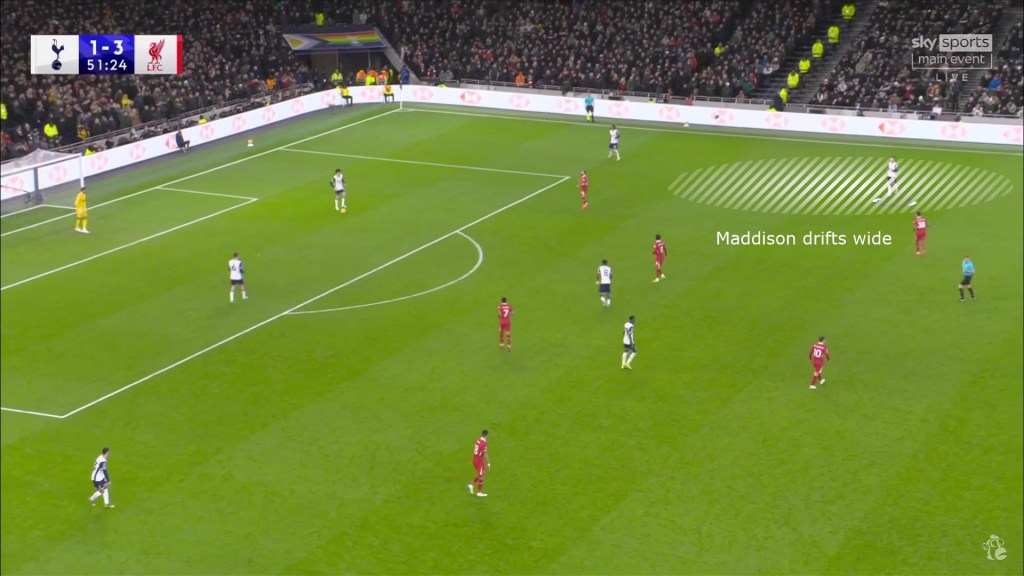
- Maddison was the one to drift wider towards the left to form a 3 or 4 in midfield while one of the pivots (usually Bissouma) dropped deeper to build up play.
- Kulusevski and Son were primary outlets for early-stage penetration into Liverpool’s defensive high line.

Tottenham mirrored Liverpool’s 4-2-3-1 formation but with a distinct focus on a high-pressing turnovers. Their man-to-man marking strategy aimed to disrupt Liverpool’s passing patterns but often left gaps, particularly against fluid rotations in Liverpool’s attack. Pedro Porro’s inverted positioning added a creative dimension in possession, but the high defensive line Tottenham employed proved a double-edged sword, offering space for Liverpool’s attackers to exploit. Kulusevski and Son emerged as key players in driving early offensive movements, leveraging their pace and technical ability to stretch Liverpool’s defense while Solanke often dropped deep in build-up.
The contrasting pressing philosophies of Liverpool and Tottenham shaped the game’s dynamics, with Liverpool’s structured approach outclassing Tottenham’s more erratic efforts, paving the way for decisive moments in transition.
Key Tactical Takeaways
Liverpool In Possesssion

- Overload and Isolate
- Liverpool often created overloads, particularly on their left hand-side to isolate and provide more space to Alexander-Arnold on the oppoisite flank.
- Szoboszlai’s movement towards the right dragged Bissouma out of position, creating midfield gaps to exploit.
- Build-up patterns.
- Liverpool used a deep defensive line for buildup, with attackers maintaining advanced positions.
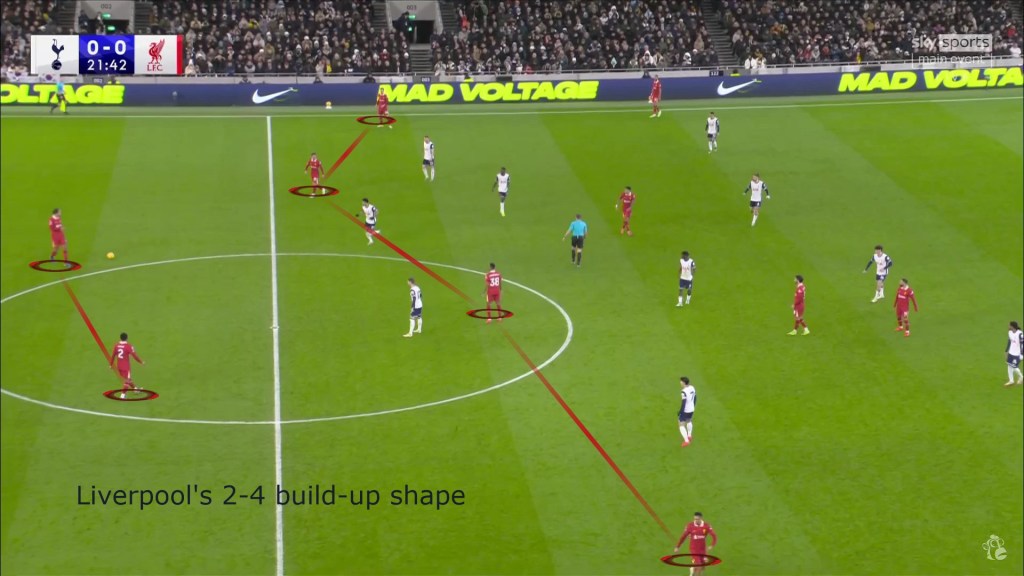
- They have a strict 4-2 or 2-4 shape in build-up with the two midfielders (MacAllister and Gravenberch) instructed to be in closer proximity to each other to offer options for bounce passes.
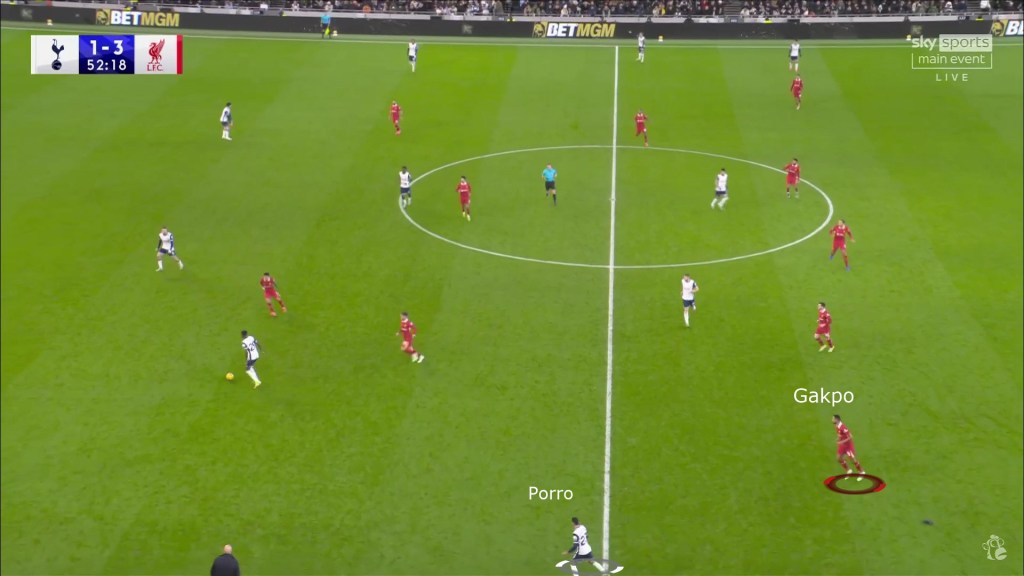
- Salah’s limited defensive duties allowed him to pin back Spurs’ left-back, enabling multiple attacking outlets in Spurs’ defensive line.
- Szoboszlai was used as a constant outlet to release the ball in attack, almost as as a target man.
- Positional Rotations
- Salah and Diaz alternated as central threats, with Gakpo and Alexander-Arnold ensuring width most times.
- Effective positional coverage and relationism ensured defensive balance during attacking plays.

Liverpool’s attacking structure leaned heavily towards direct play especially with early ball releases to forward outlets in Szoboszlai, Diaz and Salah. During build-up, Szoboszlai’s intelligent positioning often drew Bissouma out of the defensive midfield zone, providing Gravenberch with room to exploit by progressive carries. In transitions, Liverpool’s strategy of keeping attackers high up the pitch proved effective, particularly as Salah was instructed to have minimized defensive responsibilities, allowing him to focus on pinning back Spurs’ left-back Djed Spence.

Positional rotations were another hallmark, with Salah and Diaz frequently switching roles while Gakpo and Alexander-Arnold occupied wide areas. This fluidity, combined with disciplined defensive relationism, maintained balance across the pitch.
Liverpool Out of Possession Setup
- 4-4-2 Mid-Block Structure
- Central midfielders covered central progression channels effectively and funneled Spurs’ build-up to the wide areas.
- Diaz and Szobozslai often formed a narrow front two to cover any central passes, however we also saw Salah join Diaz in the front two while Szobozlai covered the right side.
- Gakpo was instructed with more defensive responsibilities compared to Salah.
- High Risk-High Reward pressing strategy
- Organized pressing forced Spurs into predictable patterns.
- Emphasis on pressing triggers when Spurs attempted to invert one of their full-backs or during a back pass to the keeper, Fraser Forster.
- Both Szoboszlai and Salah tucked inside which would sometimes leave a lot of space for Djed Spence.
- Strong Rest Defence
- At times, Liverpool’s emphasis on exploiting Spurs’ high line also created situations where they had to transition from attack to defence.
- This was often times dealt well with a strong rest defence and positional relationism amongst the Liverpool players, especially on their much more vulnerable right side.
Liverpool’s defensive structure during the match was characterized by a mix of discipline, proactive pressing, and robust transitions. In their 4-4-2 mid-block setup, the central midfielders adeptly managed progression channels, effectively funneling Tottenham’s build-up play toward the flanks. This tactical approach emphasized limiting Spurs’ ability to build through central areas. Szoboszlai and Diaz frequently formed a narrow front two, with Salah occasionally joining Diaz, pushing Szoboszlai to cover the right flank. Notably, Gakpo took on additional defensive responsibilities, underscoring the team’s emphasis on collective defending.

Liverpool’s high-risk, high-reward pressing strategy stood out, targeting Spurs’ attempts to invert their full-backs or back passes to Fraser Forster. By organizing their pressing triggers, Liverpool forced Spurs into predictable patterns, often regaining possession in advanced areas or forcing clearances from the backline. Szoboszlai and Salah’s central movements left space for Djed Spence many times, which Spurs failed to continiously exploit.


But Liverpool’s rest defense, particularly on their right flank, mitigated these vulnerabilities. Their strong positional awareness and coordinated efforts ensured balance during transitions, even when focusing on exploiting Spurs’ high defensive line.
Tottenham In-possession
- Build-up Patterns
- Heavily rely on Kulusevski and Son as the primary outlets for progression while the CF Solanke drops deeper as an option for the bounce pass.
- Porro’s inverted positioning added dynamism but sometimes led to turnovers that were very costly.
- Maddison usually drifted to the left of midfield, essentially creating a 3-4-3 in buildup with an emphasis on creating gaps by maximum width.
- Verticality
- Emphasized rapid transitions from defense to attack, targeting Liverpool’s high line.
- Often bypassed midfield, relying on long balls and quick one-twos.
Tottenham’s build-up play was centered around their wingers as the primary outlets, especially Kulusevski whose ability to progress the ball under pressure stood out. Pedro Porro’s inverted role occasionally opened passing lanes. On the other side, while Maddison was the attacking midfielder on paper, he was the one to drift to the left side of midfield in possession creating a midfield of 4 in a 3-4-3 in-possession.

Ange Postecoglou recognised Tottenham’s strength in the outball and therefore they were quite direct and vertical when building up from the back. This was further empasized in their quick turnovers, counter-press and counter attack. They also heavily relied on overloads that would involved underlaps and overlaps from midfielders and fullbacks. This however, proved to be very costly.
Tottenham Out of Possession Setup

- Pressing Strategy
- 4-2-4 shaped high-press
- Man-to-man pressing struggled against Liverpool’s fluid rotations.
- Both Bissouma and Sarr often struggled covering large spaces and covering more than 1 man in midfield.
- Turnovers in the attacking third and effective counter pressing occasionally yielded chances but very few of them proved to be clear cut.
- Defensive Line Challenges
- High defensive line exposed by Liverpool’s direct transitions.
- Poor synchronization in defensive movements created gaps.
- The defensive line was pinned back by the Liverpool front 4.
Tottenham employed a 4-2-4 shaped mid-block designed to disrupt Liverpool’s build-up, but the strategy revealed several shortcomings. Their man-to-man pressing approach proved ineffective against Liverpool’s fluid forward and midfield rotations, with Bissouma and Sarr often left covering large spaces and managing multiple opponents simultaneously.
While Tottenham occasionally forced turnovers in the attacking third through counter-pressing, these opportunities rarely translated into clear-cut chances due to Liverpool’s disciplined defensive transitions.

Defensively, Tottenham’s high line became a critical vulnerability. Liverpool’s direct transitions consistently exploited poor synchronization among Spurs’ defenders, creating gaps that the front four attacked with precision. The defensive line often found itself pinned back by Liverpool’s advanced positioning, further limiting Spurs’ ability to maintain a cohesive defensive structure. This imbalance between an aggressive pressing strategy and a vulnerable defensive line was a recurring theme throughout the match, exposing Tottenham to repeated threats in transition.
Second Half Adaptations
Liverpool’s Adjustments
- In possession, Salah occupied wider spaces more often while retaining attacking freedom.
- Greater emphasis on direct passes to exploit Spurs’ high line.
- Enhanced defensive relationism ensured seamless positional coverage.
- Focused on game management after securing a four-goal lead, which however came at a cost of conceding more goals than necessary.
In the second half, Liverpool adjusted by deploying Salah in wider areas when in possession, which expanded their attacking options while preserving his freedom to influence the final third. Meaning that he was still instructed to stay further ahead and was absolved of defensive responsibilities. The team’s emphasis on direct play capitalized on Spurs’ persistently high line, creating frequent scoring opportunities. Defensively, Liverpool’s strong positional relationism was evident, with players covering for each other seamlessly during advanced runs. This adaptability, coupled with disciplined game management after establishing a commanding lead, highlighted Liverpool’s tactical maturity. This however, did not stop them from conceding more goals than necessary.
Tottenham’s Changes
- Kulusevski shifted to a central role, influencing attacks more directly.
- Johnson’s introduction added width and attacking dynamism.
- Improved offensive output but increased vulnerability to counter-attacks.
Tottenham made key adjustments, including repositioning Kulusevski as a central attacking midfielder, which allowed him to exert greater influence in the attacking phases. This was also prevelant via the statistics, as Tottenham created 2 big chances and 1.04 xG in the second half compared to 0 big chances and 0.24 xG in the first half. The introduction of Brennan Johnson provided width, stretching Liverpool’s defense and creating additional lanes for progression. However, these changes left Tottenham increasingly susceptible to counter-attacks, as their aggressive pursuit of goals disrupted their defensive structure.
Goal Analysis
First Half Goals
Liverpool’s First Goal (22nd minute)
- Overload and isolate, allowing Alexander-Arnold ample time and space in an area that he thrives.
- Liverpool’s heavy box occupation and Diaz’s perfectly timed run into space.
- Salah’s half-space positioning drew defenders out of alignment.
- Highlighted Liverpool’s ability to manipulate space effectively.
Liverpool’s first goal showcased their tactical discipline and ability to exploit weaknesses in Spurs’ defensive setup. Their 2-4 shape is very prominent in build-up, especially the close proximity between the midfielders. However, the first goal shows how Liverpool bait the Spurs forward line to press which opens up spaces in the centre and progress the ball further forward. Eventually, they overload the left with 7 players with Alexander-Arnold being isolated in his most threating area on the right. Diaz’s well-timed run into the vacated space demonstrated Liverpool’s precise execution. Meaning Szoboszlai and Salah’s box occupations were instrumental, pulling defenders out of position and creating the opportunity for Diaz to finish clinically.
Liverpool’s Second Goal (35th minute)
- Progressive play initiated by Gomez.
- Szoboszlai’s hold-up play created time and space for supporting runs.
- Granvenberch’s movement creates gaps in Spurs’ block.
- Salah and Gakpo pinning back the Spurs fullback.
The second goal underscored Liverpool’s ability to progress the ball through tight spaces, with Gomez playing a pivotal role. A quick scan contributes to a pass that cuts through the Spurs midfield. Szoboszlai’s strength and composure in holding up play allowed teammates to position themselves advantageously. However, neither Dragusin nor Gray could get tighter to Szobozslai without exposing gaps in a defence that is already pinned back by Salah and Gakpo occupying high and wide positions. Robertson’s precisely executed cross left the defense scrambling, culminating in a scrappy but deserved goal.
It is important to note that Archie Gray’s lack of physicality in an out of position role (to no fault of his own) was also a contributing factor to Liverpool’s second. And this won’t be the first time that Liverpool would be exploiting that in the match.
Liverpool’s Third Goal (45:10)
- Originated from Spurs’ disjointed press.
- Alexander-Arnold given too much time on the ball for a player of his quality.
- Spurs were unable to come up with a solution to the LIV wingers pinning their full-backs.
- Szoboszlai once again instrumental as a target-man in bypassing defensive lines.
Liverpool’s third goal capitalized on Spurs’ lack of defensive coordination during their press. With both Salah and Gakpo once again having pinned back the Spurs full-backs, leading to a completely disjointed press from the Spurs team. The disorganized efforts in press left gaps between the midfield and defense lines that allowed Szoboszlai to drop into. This meant that Dragusin got dragged into the centre which allowed space for Salah to exploit and make a run into. This goal exemplified Liverpool’s superior tactical awareness and ability to punish structural weaknesses and a lack of cohesion in the press.
Tottenham’s First Goal
- Stemmed from effective counter-pressing by Spurs.
- Ball recovered high up the pitch, leading to a direct attack.
- Clinical finish following a quick turnover.
Tottenham’s first goal came as a result of their effective counter-pressing strategy, a rare moment of success in winning the ball high up the pitch. The sequence began with Spurs intercepting Liverpool’s attempt to play out through Mac Allister, quickly transitioning into a direct attack. The quick turnover left Liverpool’s defense unstructured, and Maddison capitalized with a great finish, demonstrating just why they excel and insist on a high-pressing defensive structure.
Second Half Goals
Liverpool’s Fourth Goal
- Originated from Spurs’ poor rest defense.
- Quick counter-attack created a 5v3 scenario.
- Highlighted Spurs’ increased vulnerabilities in transition.
- Archie Gray being the unfortunate liability in defence.
The fourth goal was an appropriate example of Liverpool’s counter-attacking football against Spurs’ inadequate rest defense. A rapid transition created a numerical advantage, which Liverpool capitalized on with efficiency. This goal highlighted the inherent risks of Spurs’ aggressive approach.
Liverpool’s Fifth Goal
- Showcased Liverpool’s rapid counter-attacking prowess.
- Spurs’ vertical progression attempt broke down, leading to a quick Liverpool transition.
- Defensive disorganization from Spurs was exploited during the counter.
- The sequence emphasized Liverpool’s ability to capitalize on defensive lapses in transitions.
Liverpool’s fifth goal perfectly illustrated the effectiveness of their rapid counter-attacking play. Spurs’ attempt at vertical progression broke down, and Liverpool quickly transitioned into attack, exploiting the disorganized defensive structure left behind. Luck also played a role, as Gray’s failed attempt to clear the ball resulted in it landing directly at Szoboszlai’s feet. With impressive composure, Szoboszlai cushioned the ball and delivered a precise pass to Salah, who clinically finished the move. This sequence highlighted Liverpool’s ability to punish defensive lapses with swift and incisive counter-attacks, exposing Spurs’ vulnerability in transitions.
Tottenham’s Second Goal
- A great depiction of the ‘basketball’ game state.
- Interception of Liverpool’s incessant direct play.
- Kulusevski’s individual brilliance led to a superb finish.
- Spurs capitalized on a rare transition opportunity.
Tottenham’s second goal demonstrated their ability to seize upon transition moments, with Kulusevski showcasing exceptional skill and composure. It all starts from Spence spotting Solanke making a run in behind and attempting a through pass that gets intercepted by Trent who attempts the usual ambitious through pass of his own which gets intercepted by Spence himself. At this point of the match, the game-state was more akin to a game of basketball considering both the team’s incessant nature of direct play. With Spence having intercepted the pass, 4 Liverpool players were already out of the press which Spurs are able to exploit effectively. Kulusevski and Solanke’s individual brillance contributes to a stunning volley by the former, providing a brief resurgence for Spurs.
Tottenham’s Third Goal
- Exploited Liverpool’s right-side vulnerability.
- Effective overload with Spurs increasing width.
- Demonstrated improved coordination in Spurs’ attack.
The third goal marked a significant improvement in Spurs’ offensive coordination, as they successfully exploited Liverpool’s right-side defensive gaps. Increasing their width, Spurs created an overload scenario that resulted in a well-constructed goal. This moment underscored the potential in Spurs’ attacking approach when executed with precision.
Liverpool’s Sixth Goal
- Spurs built momentum after their third goal, with Porro attempting a through pass to Solanke.
- The pass fell short and was intercepted by Van Dijk.
- Van Dijk showed exceptional composure under pressure from five Spurs players during their counter-press.
- Liverpool initiated a swift counter-attack, exploiting Spurs’ defensive gaps.
- Díaz displayed precision and calmness to deliver a clinical finish, sealing the game.
- The goal highlighted Liverpool’s ability to punish Spurs’ aggressive pressing.
Liverpool’s final goal showcased their ability to capitalize on Spurs’ aggressive pressing and defensive vulnerabilities. The sequence began with Spurs patiently building momentum after their third goal, culminating in Porro’s through pass that nearly put Solanke through on goal. However, the pass fell short and was intercepted by Van Dijk, who displayed remarkable composure under pressure from five Tottenham players during their counter-press. Liverpool’s captain then orchestrated a swift counter-attack, exploiting the defensive gaps left by Spurs’ aggressive positioning. Díaz’s poise and precise finish in the final third ensured the goal, effectively sealing the match despite Spurs’ spirited late resurgence.
Key Tactical Lessons
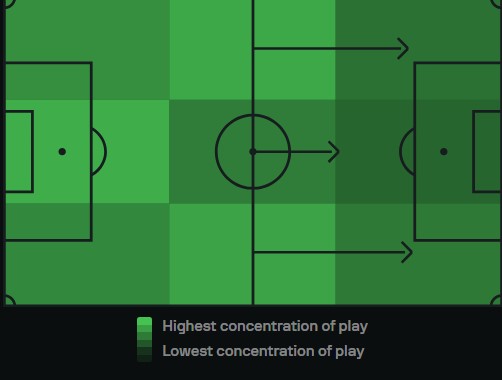
Liverpool’s dominant performance against Tottenham Hotspur was an indication their clinical finishing, tactical superiority, and efficient pressing. However, context adds depth to the analysis. Liverpool fielded close to a full-strength squad, while Spurs were significantly weakened by the absence of key players in their defensive line. Despite these disparities, the match’s narrow possession margin (52%-48%) and near-equal final third entries (51-50) highlighted the relentless and constant nature of the game state. Both teams prioritized direct entries into the final third, producing a fast-paced, high-intensity contest.
Liverpool’s attacking superiority was evident in their 5.63 expected goals (xG) compared to Spurs’ 1.27, underlined by 24 total shots and 11 big chances created, six of which were converted. Their ability to exploit Spurs’ high defensive line led to 51 touches in the penalty area and three incisive through balls. Conversely, Spurs managed just two big chances and struggled to capitalize on turnovers, despite occasionally disrupting Liverpool’s build-up with advanced counter-pressing.
While Liverpool dominated both statistically and on the eye test, vulnerabilities in their system remain apparent. Their high line, reliance on structured pressing, and occasional lapses in defensive transitions leave exploitable gaps, particularly against teams capable of efficient vertical progression. Despite Spurs’ depleted defense, they managed to expose Liverpool’s weaknesses during isolated moments, a fact that could serve as a blueprint for future opponents. In conclusion, while Liverpool’s performance was commanding, their system is not without flaws, and these vulnerabilities could prove costly against better-prepared or more clinical opposition.
